Showing posts with label The Thrifty Scrapper. Show all posts

Tuesday, May 24, 2011

Learning about ART

 *** lots of links, lots of information ----->>>>> proceed with caution!!! ******

 I am a very curious person and always eager to learn new stuff. I love to browse on Youtube and watch Orchestras playing or artists sharing painting or drawing techniques. So I recently began sharing those with my children.

I also subscribe to The Crafty Classroom.  I found Valerie in one of my many surfs through the web. She was using Van Gogh (Getting to Know the World's Greatest Artists) to teach her children about the artist and she did some cool projects with it. I had to jump in and play too.

 Here is my DD8 artwork. Instead of the pastels used in Valerie's tutorial, we used crayons. You can still see the details of Van Gogh's artwork because of the glue behind the crayons. click on the image to see the details and make sure to check Valerie's link.

I am always for using what I have in hands instead of running to the store and buying new supplies. I got my house overflowing with stuff. How about you?


So anyway, I requested the book at my library. They didn't have it so they borrowed it from another library. yes, they can do that! Check out in your library and see if they have this service available. It's free to you.
 
After working with Van Gogh we borrowed the DaVinci book. I had been researching a craft about Resurrection Sunday that did not involve eggs or bunnies but Biblical icons instead.  I was glad when I received Barbara Curtis' monthly newsletter and she had some very helpful links in there. 

 One of the links lead to a website that taught how to make the scene painted by DaVinci of the Last Supper. How appropriate and I had the book!! As soon as my DD8 saw the craft supplies she exclaimed "oh, we are going to do the Last supper! I saw that painting from that book that I just read!"


Here is our Last Supper craft using egg cartons and print out coloring pages. All of my children participated in making the scene: some coloring, others cutting the figurines, another checking the original painting to see where each disciple went. We also heard the account on audio CD. Click on the image to enlarge it and see the details.


Here is a close up of the craft. You can see the details of the actual supper on the table and the egg cartons behind the paper figurines.


 I have also purchased the book on the left. I am planning to begin using it with my children. As you might remember my children love to draw! Don't all children love to draw? LOL


I am learning to relax with my children. Messes still make me squirmish but I am learning to go with the flow. :) I hope you will take the time to play and do some art today. :)

Blessings,
Tereza

Monday, May 16, 2011

What's for dinner? Homemade Pizza


Do you ever get stuck when preparing  dinner? I do.

I used to have a menu planned out but then I got bored with it. I love to create on a whim and the menu didn't allow for much impulsiveness. :)

anyway, the other day, I was stuck and I was talking to a friend on the phone and she said she had used my idea of making pizzas on the grill. Instead of the grill, she used the oven and flour tortillas.


 So, I thought, "hey! I bet I can make my pizzas in the oven too!"

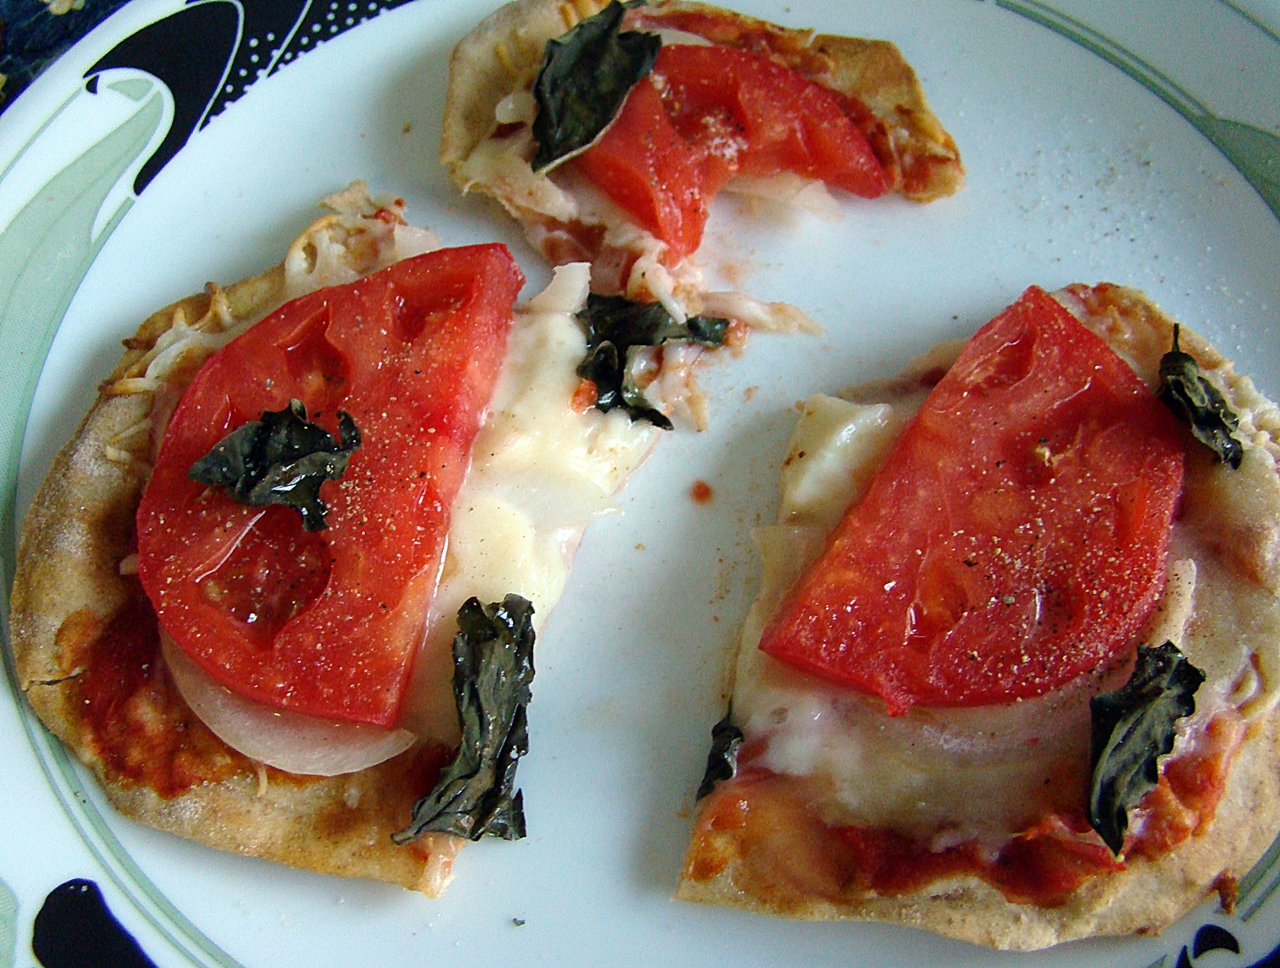
So I got a couple of Jiffy pizza crust mix boxes and added 1 cup of hot water. While the over preheated the dough rested. Once the oven was heated to 450 F, I cut the dough into pieces and rolled each into a 6" diameter "circle". (As you can see on my photo they are not really round!) I laid them on top of the oven rack for 2-3 minutes each side or until slightly golden.

 Once they were cooked, I laid my ingredients on each piece and returned them to the oven to melt the cheese. Probably another 5-7 minutes, depending how well melted you like your cheese.


When I roll my dough I use whole wheat flour to add a bit of texture to the crust. I spread tomato sauce on each one, mozzarella cheese, beautiful big red slices of tomato, slices of  Vidalia onions and fresh basil from my garden. Once they are ready, drizzle extra virgin olive oil on them and sprinkle sea salt and fresh ground pepper. Yum!! As you can see I couldn't resist and took a bite before I took the picture!!

These are fun and easy to make. You can engage your children and let them roll their own pizzas, or to avoid bigger messes, just let them pick their own toppings and arrange them on top of the cooked pizza crusts. My children love them.

You can also cook the crust ahead of time, and freeze them. When you need them, take them out lay out your toppings and put them in the oven to melt the cheese and lunch or dinner is ready. Enjoy!!!

Tereza

Thursday, May 12, 2011

Thrifty Thursday: The Day time stood Still

I decided in the beginning of this year not to buy any more papers and embellishments until I downsize my studio. I had way too many papers from old collections that I love and just couldn't part with them. So I am using them. It has been a breath of fresh air to find new ways to use them. I have been incorporating them to more artistic and free style scrapbooking and it has been so much fun.

Here is a layout I just finished last week.


All the papers used are old... maybe 5 to 6 years old. Some are from Walmart and some from a QVC kit I purchased. could you tell??


I drew some flowers on a brick colored paper and then cut it out. I then stamped some white prima flowers I had on hand and added some orange brads for color. There!! My own customized flowers. I talked about how to customize your letters HERE or how to distress brads and eyelets HERE. 


Some plain old white acrylic paint brushed on the background and then sprinkled on it made for a sure artistic and shabby look. 

So here is my Thrifty Thursday tip: use your old papers to their advantage. For example, if the paper is vintagy and has vintage image on them, cut them out and use them as embellishments. If the papers are colorful use strips or small pieces of it to bring color to your layout. Are the papers too busy?? cut them into strips and make flowers out of them or punch out circles and create your own background.


There is so much out there and I just can't afford it all. So I am revamping my old papers. How about you? What do you do with old collections?

For more Thirfty Thursdays come HERE.


Be blessed,

Tereza

Wednesday, April 13, 2011

Thrifty Thursday : Salty, quick and yummy!!

I love cole slaw but not the North American style. In Brazil, we blanch our cabbage. We also don't shred it, we slice it so it ends up in long strips.

At my house, I usually buy a whole cabbage and slice it. Then I saute some garlic and olive oil and add the cabbage. I season it with salt and pepper or a little cumin and saute everything until the cabbage is wilted. It takes about 10-15 minutes. I use high to medium heat so that the cabbage gets a bit braised. You have to watch and stir constantly. It's almost like cooking on a wok, you can't just walk off.

The children and the husband love the cabbage like this and it's still crunchy and has awesome flavor.

Now for the Thrifty Thursday tip... the other day I was craving some salty salad but did not have any lettuce or other green leaves. I did have some left over sauteed cabbage in the fridge. So I came up with this recipe... (Please know I don't measure anything. I do like Rachel Ray, I eye bawl everything.)

In a bowl I mixed:
Shredded carrots, (about 2 medium ones)
chopped celery, (2 stalks diced really small)
sliced Kalamata olives (probably about 12 big ones)
cilantro (one handful chopped)
and my left over cabbage. (I would say it was about 3-4 cups already cooked)

I seasoned it with some of the water from the kalamata olives, extra virgin olive oil and pepper. No need for salt since the cabbage was already seasoned and the water from the olives is pretty salty. Here is the result:


It was really good. It was crunchy, refreshing, savory and yummy all at the same time!!

It was such a great success that I made it again this time with some variations:

- Instead of celery I added sliced water chestnuts.
- Added some chopped grilled chicken breasts and 1 tablespoon of Mayo.
I served it on crackers instead of a side dish.

Here is my challenge to you: what salad can you whip up with ingredients you have right now in your fridge or pantry?

For more Thrifty Thursdays go HERE.

Be blessed,
Tereza

Thursday, March 10, 2011

Thrifty Thursday: storage for my ribbons!!


**** This is a re-post from my other blog that has been put on hold*****

Check out the BLOG CANDY on the side bar!!!

The other day I was trying to organize my craft room. It used to be my dining room now it is our library/ craft room/ study room. 

I needed a place to store my ribbons. I have so many spools and I thought maybe I could hang a rod on the wall and store them there. My DH (he is wonderful) made a big fuss about making holes on the wall and what rod to get and blah blah blah.


I realized it was going to be a big problem and I would have to wait a while before I got my storage solution. So... I just put my brain to work and came up with this.


I used an old bulky piece of Styrofoam I had in my closet where I store my boxes and shipping supplies. I covered it with a piece of fabric and stuck some bamboo kabob sticks in it. Then I organized my spools by type and size. To finish it up I covered it up with another piece of fabric to keep it safe from the dust.

There is a saying in Brazil that says "If you don't have a dog to hunt with, you hunt with a cat." Can you translate that into an English saying??

Now, it may not look the best but it solved my storage problem. :) Hey, the day my studio looks like something out of a magazine, it will probably BE in a magazine. LOL

Next week, I will try to share some photos of my Studio. You can see my all finished up and messy "studio" HERE.  You might remember my husband made me a new table. You can see the Before pictures here.

How do you store your ribbons??? Thanks for stopping by,
Tereza

Thursday, February 10, 2011

Thrifty Thursday: customizing your letters!

Thrifty Thursday was born to boost my creativity using what I had in hand. Like most crafters I have way too many supplies that I don't really put to good use. So instead of purchasing a new tool or an embellishment I am using what I have at home. So share your insights.... here is my tip for this week.

Last week I created a layout for my DD3 on a whim. As I was laying out the papers, flowers and photos I realized that the chipboard letters I had were not going to work. So I customized them.

I used white chipboard letters and with a black pen I doodled on them. Then I used the markers I had on hand, nothing fancy or expensive like Copics (hey, if you got them, use them!) and colored my doodles.

Then to make it look funkier and thrown together, I used an old book as the background for more letters. I used a permanent markers and drew my own letters, cut then out and adhered to the layout.

I don't usually make resolutions in the beginning of the year, but in an informal way, I have decided not purchase any more papers or embellishments until I cut my supplies in half. I have found that this decision has forced me to become more creative and I have found new uses for old supplies.

How do you use your old supplies? Do you have a favorite supply that you haven't used in a while? Did you like this week's tip? For more check out all Thrifty Thursday's posts here.

Be blessed,
Tereza

Saturday, January 29, 2011

New Creations on the way.

In  2009, I shared how my husband made me a craft table and we re-organized my studio, which used to be our dinning room.


Well, this is what it looks like when I am working on 4 projects at the same time. I can see you cringing. :)

I know what you are thinking "How the heck does she find the projects she is working on?"

Let me tell you, it's a battle, but that is the only space I have to work with and I like to spread out. So, at times, I have to lift stuff out of the way to find the stamps or chipboards I am working with.

But I can't complain... I got to be thankful for what I got now, praying and waiting for my big studio with lots of windows and natural light, a central island and lots of working space around the room.

Anyway, the other day I was browsing Two Peas in a Bucket website and found this project. I thought it was the cutest and smartest thing ever, so I decided to make me one. I had just placed an order with Two peas and when I got my box, guess what? 


 There was a cardboard sheet in there, so I cut it into pieces and began working on it. Here is a close up of the album in process.

If you would like to know the artist behind this awesome album check her blog HERE. 


Here is the new Martha Stewart Swirling Lace Punch Set I bought and some of my digital vintage images that I use on my cards.

Besides the cardboard album, I am working on 3 vintage baby chipboard albums. So this post is just to let you know that I am still scrapping. You might have stopped by recently and read about homeschooling, reading and putting children to bed and thought what happened to all the vintage projects. Well, we are still working on those too besides changing diapers, putting babies to bed and cooking dinner. Yeah, I am a full time scrappin' Mom!!!

Ah, if you are considering making a Scrapbook Wedding Album on a Budget do check out this post!  I will, also, soon post on the foods I ate to help me lose 20 pounds. Follow me or subscribe to my blog to be notified of when I post. :)

Have a blessed weekend and thanks for stopping by!!! :)

Tereza

Sunday, January 23, 2011

The Thrifty Scrapper: How to make a Scrapbook Wedding Album

A while back I shared about the Scrapbook Wedding Album that I made on a budget. We used a Martha Stewart Wedding kit that my sister in law had previously purchased at Walmart. I think she paid less than $20.00 for it. It was on sale. On that previous post, on the link above, I shared some of the pages with the bride's wedding photos on them.

As promised, below you can see the video where I share all 20 pages before they were delivered to the bride. In the video, I share what I used and how we cut corners and used what we had on hand. Please excuse my fidgeting with the camera, blinds and pages, as well as the children's noise in the background. I have a busy household. :)

I hope to inspire you to think outside the box and that even if you don't have the money, you can still make beautiful creations and memorable keepsakes! Enjoy!


How have you creatively used your own resources lately?

Have a blessed week, :)

Tereza

Thursday, January 6, 2011

Thrifty Thursday: how to function with a fussy baby!


Baby is teething. We had a fussy night and I never got to the computer to publish my Thrifty Thursday post.

So I am sharing with you a post I did a while back about how to re-purpose your old stamps. If you haven't seen the post yet, then this is your change to and also to subscribe to my blog or follow me to keep up with Thrifty Thursday where I share techniques to re-vamp your art using what you already have at home. No new purchases necessary!!!

If you have already seen the post, I say go check it out again anyway, it might get you out of a rut, if you are stuck for creativity. Or it might remind you of some great stamps you have stocked away that you haven't used in a while. So here it is:

NEW STAMPS USING YOUR OLD STAMPS

 ok, back to taking care of baby. :)

Be blessed,

Tereza

Thursday, December 30, 2010

Thrifty Thursday: making it shabby with acrylic paint!


This is our first Thrifty Thursday. The idea is to share with you a technique that does NOT require new scrapbook supplies or tools, but can be done using what most of us already have at home.

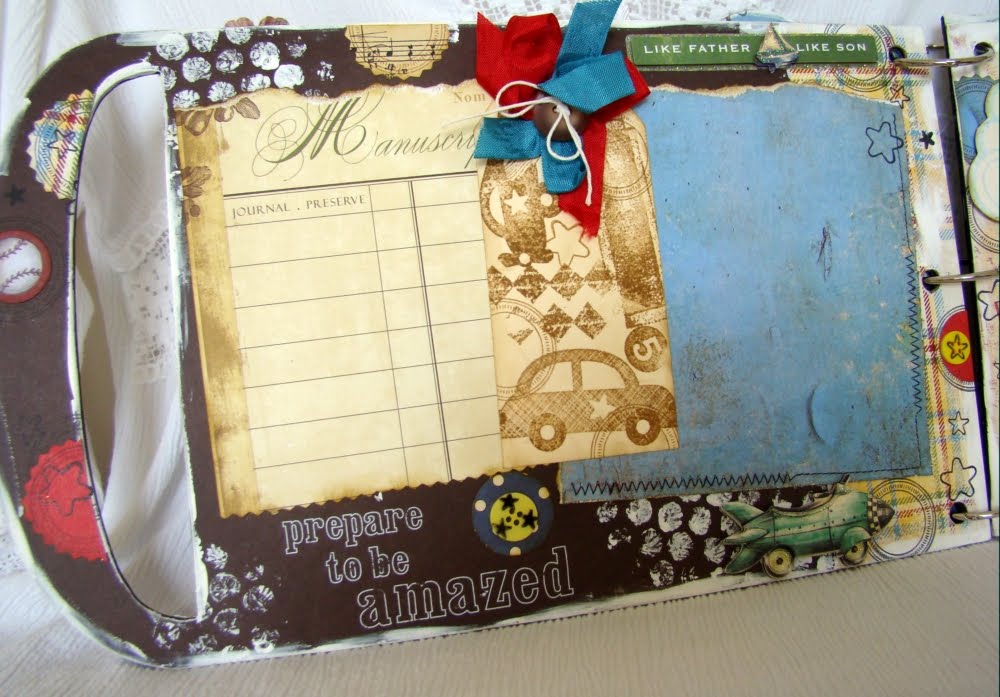
Today I want to share with you how to make something look old, vintage, shabby or distressed looking. A while back I finished a custom order for 2 vintage scrapbook albums for 2 brothers. Here is a sneak peak of the first album. I wanted to achieve a fun, distressed, old look without making the albums feminine at all. So I decided to use paint - white acrylic paint. I found it is the best way to make something look shabby.

Now you don't need any special tools to apply your paint and any acrylic paint will do. But because acrylic paint is rather thick it can be very tricky to use it on rubber or acrylic stamps. They tend to get all sticky and you can't see much of the detail of the stamps, unless it is a big one or a foam stamp but that's another post.

I used two simple tools for my technique. I used water bottle caps and medicine measuring cups to make the white circles on my latest album. I also used my finger to dab the white paint around the edges of my album. I tried using a make up sponge but I liked the result of using my fingers better. I was going for a messy, smeared look.


First squeeze some paint on a paper plate and spread it flat like you would icing on a cake, then use the cap and cup to start stamping. Don't worry about perfect prints, you are going for shabby, not perfect prints. You will have some circles thicker, with missing pieces to the circle, others lighter. the paint dries really quickly too.


The first photo on this post is an example of the result of this technique. You can see the complete result on Carson's album HERE and Camden's album HERE.

You can use other tools with this same technique. Try using bubble wraps, the end of pencils, a sponge, a paper crinkled into a ball or anything else you can think of and already have at home.

On the card below I smeared the edges with white paint.


Here is an example using green paint and bubble wrap.


How do you use acrylic paint? Would love to hear about your results and your discoveries.

I wish you a Happy New Year!!! Until next Thursday, stay thrifty and crafty. :)

Be blessed,

Tereza

Tuesday, September 28, 2010

A new route.


I have decided to devote more time to my children. Besides my husband, I am their only caregiver and spend 24 hours with them. We homeschool and I truly enjoy having them at home but....

I have recently noticed that I was getting stressed and sidetracked with my scrapping and it was not doing our relationship any good. So, I am, once again, prioritizing. :) If you have followed my blog you know I have done this in the past.

I am re-organizing my blogs and I will keep everything here. I will be posting Thrifty Thursday here, Unschooling posts, useful daily tips, as well as my bridal cards and any other treasured creations here. I think keeping everything in one blog will help me.

If you are coming over from my other blogs I hope you will keep coming back. :) I have some new cards I made for Operation Write Home that I want to share with you as well as some layouts and techniques, so do come back. :)

Now, if you would like a custom order of something. Just email me. I will be happy to work with you. :)

Have a great week and blessings,

PS Sweet baby on the above layout is my niece. This was one of the many layouts I got to make for her when my parents were here last. :)


Tereza

Tuesday, June 29, 2010

Bikas' Album - a sneak peek.


I am almost done.

Just wanted to share a few sneak peeks of my recent custom album.

Would you like to see how it's made? Then go here.


Thanks for stopping by,

tereza

Wednesday, June 16, 2010

Awhile back...

>


Hi everyone,

I had a rough night. My parents are arriving this coming weekend and I got a cold. I am all stuffed up and stayed up all night with my baby girl. This morning I took communion and I feel better already. Praise the Lord Jesus!

Anyway, I just wanted to share a few flowers I made awhile back. Last year when I was very pregnant and had to wear the same uniform over and over again (if you have ever been pregnant you know what I am talking about) I got some inspiration from Julie's shop and her gorgeous flowers and decided to make one to embellish my denim jacket (part of my pregnancy uniform).


Doesn't that look better? I got inspired and created some other flowers using stamps and some Prima flowers. You can check out this VIDEO to see how I made them.


Here are some samples of Julie's flowers. They are so very exquisite and will add to any outfit I bet. Be sure to check them out. I am sure you will find a favorite one. :)


I will be doing a Give away soon at my OTHER BLOG so be sure to follow me there so you know when it happens.

ok, now I got to get back to bed. Have a nice week and thanks for stopping by,

Tereza

Thursday, June 10, 2010

Breastfeeding on demand...


I got my hands full with J. who is 4 mo. old. I have some fun posts coming but tonight I can only upload a few cards. :)


Check out The Thrifty Scrapper for a tutorial on a new custom album I am making.

thanks for stopping by,

Tereza

Thursday, April 29, 2010

Thrifty Thursday and my new YouTube channel!

Hey everyone,

I have been so busy! I just got a new custom order for another Word Album and I am hoping to be able to share the how to of it here. :) Yes, isn't that exciting?! I got a YouTube account so you can go check it out HERE and see all the videos I have already uploaded there.

You can also check Thrifty Thursday every week to see a technique or a tip that will not bankrupt your wallet or bank account or credit card! ha! LOL

Today I am sharing how to make your own flowers with what you got!


I am also making a ton of cards for Operation Write Home! This is an awesome organization and you should join in and make some cards too. Here is a video showing off some of the cards I made.


There's still time to make some Father's Day Cards, so be sure to join in.

Would you leave a comment so I know you stopped by? Have a blessed week!

Tereza

Thursday, April 22, 2010

Sneak peek of my Shabby cards!

Today is Thrifty Thursday over at TheThriftyScrapper. Hop over there to see what you can make with the stuff you already got!!

But before you do that, here is a sneak peek at some vintage cards I made on Tuesday night. I will be sharing one of my greatest challenge creating these on next week's Thrifty Thursday. So be sure to follow my blogs.


I hope to have inspired you today! Be blessed,

Tereza

Saturday, April 17, 2010

Camden's Album


Hi everyone,

I finished the second album last night. Here are few details on these albums: they are MDF not chipboard, they are about 8" tall and go as long as the word, sometimes 13-14" long. They are heavy, massive and gorgeous. The perfect decor for a mantle or a beautiful dresser.

I will be sharing some of the techniques and secrets of these albums on my other blog The Thrifty Scrapper. So be sure to stop by there and follow the blog to be notified when I post. Now to more photos... :) Be sure to click on them to enlarge and see the details up close.


I will be sharing the house cards tomorrow too.

Let me know you stopped by, leave me a comment? :)

Have a blessed weekend,

Tereza